No-code eKYC and Biometrics integration to FlutterFlow with UpPass
In today’s digital age, the use of online services has become increasingly prevalent, and as a result, the need for a secure, fast, and efficient way to verify identities online has become more important than ever. Electronic Know Your Customer (eKYC) validation has emerged as a viable solution for online identity verification, and integrating it into your FlutterFlow app can help you provide a seamless experience for your users. For today, we will discuss how to simplify your EKYC integration to FlutterFlow with UpPass.
FlutterFlow is a low-code platform that allows developers to build mobile and web applications quickly and easily without writing code (no-code). However, integrating EKYC into your FlutterFlow app can be challenging, especially if you’re not familiar with the technology involved. However, with UpPass, you can simplify the entire process and integrate EKYC into your app seamlessly.
What is UpPass?
UpPass is an integrated platform that unifies verification methods, credit risk, alternative and local data sources to stay compliant in SEA, mitigate online fraud, and automate decisions in a minute. We orchestrate onboarding, fraud detections and localized DB checks for Fintech to scale in SEA, cutting integration time to a matter of weeks not quarters. You can build the verification steps without writing code (no-code) that fit your use cases and user journey.
- Cut down development time and integrate in an afternoon
- World class level identity verification out of the box.
- Brandable flow experience
- Support over 10K document formats and 240 countries.
- Localized data access for Southeast Asia.
Follow this step-by-step tutorial and streamline your EKYC process and get your app up and Simplify integration in just a few steps. Here’s
Step 1 : Sign up for UpPass & Create Verification Form
The first step is to sign up for a registered account with UpPass. You can do this by visiting the UpPass website and following the instructions on the screen. Once you’ve signed up, you’ll have access to the UpPass dashboard, where you can configure your verification settings. In the UpPass dashboard, you can configure your verification settings based on your business needs. You can customize the verification process such as Biometric eKYC, ID Verification, Bank Statement Verification, Email Verification or Mobile Number Verification, including the style of branding you are able to customize both colors, fonts, or logos as you require.
Step 2: Getting Start with FlutterFlow project
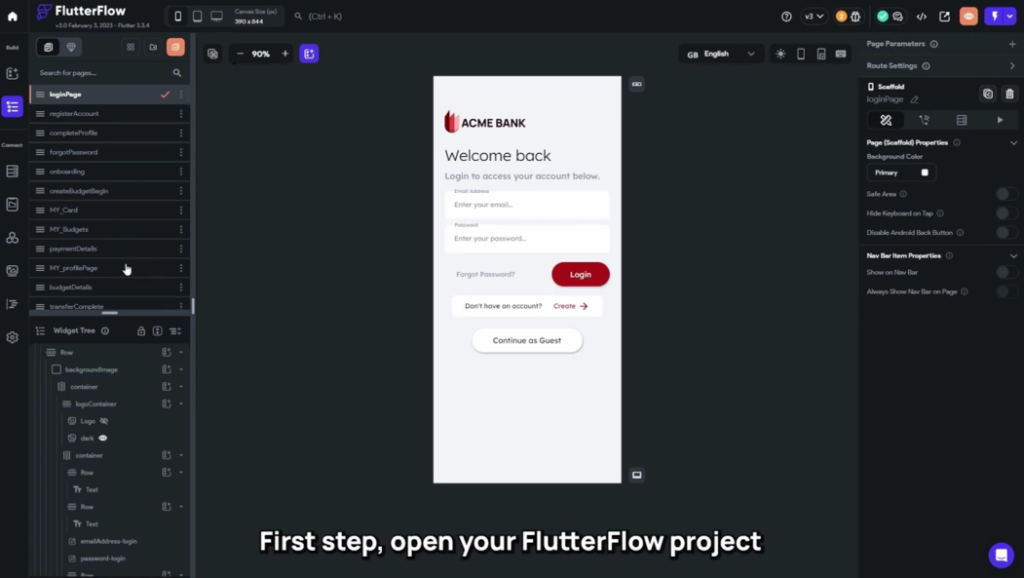
Make sure it doesn’t have any fetal bug to prevent unwanted situations along the way and for the best outcome your project should connect to Firebase and fully setup (Firestore DB, Authenticate, Storage). If you’re ready to proceed let’s start with drag and drop a simple button to your project.
Step 3: Generate an API Token
After you Create Workspace in UpPass dashboard and navigate to the page where you want to integrate, you’ll need to generate an API Call. The API Call is a unique identifier that allows your FlutterFlow app to communicate with UpPass.
UpPass API provides access to call various verification APIs from your system. The APIs are REST based and accept both GET and POST apis with parameters. You will need to request access such as app_id,app_secret keys and api_token from the UpPass team in order to test UpPass APIs to integrate to the FlutterFlow project.
Learn more about UpPass API: https://docs.uppass.io/
In the FlutterFlow project, you need Create API calls in order to communicate with UpPass services.
UpPass Form API Token
UpPass API URL : “https://app.uppass.io/en/api/forms/[form_slug]/create/”
Method Type : POST
Header :
“Accept-Language: en”
“Authorization: Bearer [api_token]”
“Content-Type: application/json”
Variables :
“form_slug” type : String
“api_token” type : String
This API will use the API token that you’ve got from the previous API call to request UpPass to create a form session and then respond with the URL of that form. Additionally, this API call contain two variable which is [form_slug] and [api_token] the reason why both of them need to be in square bracket is to tell FlutterFlow that both of them are variable
To put this whole API call process into simple terms, it is a simple exchange of information between your app and UpPass services. Your app first sends your UpPass login information to obtain an API Token, which is then stored in a temporary value storage called a “JSON Path.” This token is then passed down to a second API call, where it is used to initiate an Identity Verification session. UpPass will then send back a session URL to your app, which can be used to redirect the user to the UpPass Identity Verification form.
Step 4: Custom Action on Flutterflow
This step is about creating an automated system for the API call process. Begin by adding a custom action to the button created in Step. The first action will be an “API Call” to UpPass Login API. You’ll notice that the action flow splits into two branches: “If success” and “If fail”.
- For the “If success” branch, add the second API call to UpPass Form API. You’ll need to define two variables: “[form_slug]” using the form slug found in the UpPass dashboard, and “[api_token]” using the value stored in the JSON Path from the previous API Call. The last action is a “Launch URL” to redirect the user to the URL obtained from the second API Call.
- For the “If fail” branch, you may need to implement an “Alert dialog” to handle any exceptions or errors that may occur. This could involve displaying a message to the user indicating the failure and providing guidance on how to proceed, or attempting to retry the operation.
Step 5: Deep Linking
Deep Linking is simply your app’s unique URL that’s used to launch your app via hyperlink; this will allow UpPass to send your customer back to your app after they’re finished the Identity Verification process. Start by enabling Deep Linking in your app’s “App Detail” menu and setting a unique URL Scheme. Then, copy the URL Scheme and paste it into the “Redirect URL Link” setting in the UpPass dashboard. While you’re there, take the opportunity to customize your form with UpPass’s form builder.
Step 6: Webhook
In this step, we’ll set up Firebase to receive information from UpPass via webhook. The idea is, after your customer completes the identity verification process, UpPass will send back information. This will allow you to store the information in Firestore or update it in your app database. However, setting up Firebase to listen for webhooks is beyond the scope of this tutorial and may require a separate video.
- Connect your FlutterFlow project to Firebase (Optional) for more information please visit this link below : https://firebase.google.com/docs/functions/database-events
Step 7: Testing your App
It’s time to test your work! Simply download the .apk of your app and install it on your mobile phone to see if everything works as expected.
Integrating EKYC into your FlutterFlow app doesn’t have to be complicated. If you are looking for a simple and secure way to integrate EKYC into your FlutterFlow apps, then UpPass is the perfect solution for you. You can simplify the entire process and add powerful customer verification capabilities to your app. By following the steps outlined above, you can quickly and easily integrate UpPass with your FlutterFlow app and start verifying customer identities in real-time.
Benefits of using UpPass for EKYC integration with FlutterFlow
- Reduced development time: UpPass is an integrated no-code platform that unifies verification methods and data sources that can be easily integrated with FlutterFlow. This can save businesses a significant amount of time and money on development costs.
- Improved security: UpPass uses the latest security technologies to protect customer data. This helps to ensure that customer data is safe and secure.
- Increased compliance: UpPass is compliant with a variety of regulations, including E-KYC and AML regulations. This helps businesses to comply with regulatory requirements.
- Enhanced customer experience: UpPass provides a seamless and user-friendly experience for your branding Identity. This helps to improve customer satisfaction and loyalty.
Follow this step-by-step tutorial and streamline your EKYC process and get your app up and running in video “10-minute eKYC biometrics verification integration with UpPass on FlutterFlow (no-code!)”.
If you are interested to discuss how we can help or explore the solution: schedule the demo
Learn more about UpPass: Start for free & get 100 credits
Read more articles at https://blog.uppass.io